Issues connecting to the server
The most common error people receive when trying to connect to the server is Permission denied (publickey). There are a number of reasons this error can occur, but they all come back to one root issue - the server isn't able to log you in using the credentials that it's been provided.
Below are some steps you can follow to try and identify where the issue is and resolve it. If this doesn't help, going back to the beginning (Generating SSH Keys) and trying again is normally the best solution.
Note
If you can connect to CSCT Cloud using the terminal, but not using Visual Studio Code, skip to checking your SSH configuration file.
Check you have a valid SSH keypair
We'll start by checking you have valid public and private keys available.
Warning
If you chose to generate your keys in a non-default location, or used a public key algorithm other than rsa, the file names and paths for your keys won't match those below or used elsewhere in this documentation.
If you're not sure what the correct paths or file names should be, go back to Generating SSH Keys and follow the steps as they are written.
Check your keys exist
When you generated your keypair two files (id_rsa and id_rsa.pub) should have been created in a directory called .ssh in your home directory/user profile directory. We can test these exist using the commands below.
UWE lab computers
On UWE lab computers you need to move your key files onto OneDrive so they are available on other lab computers around campus.
You should use the commands specific to UWE lab computers to test your keys have copied to OneDrive and are correctly located.
The following three commands should all output True if you have keys in place.
The following three commands should all output True if you have keys in place.
If any of these commands does not output True then you should go back to Generating SSH Keys.
Check they are valid
We now need to check both key files contain information in the expected format:
Public key
The command below will echo your public key to the terminal, it should look like the output below - starting with ssh-rsa, having a line of characters, and then finishing with a comment (normally your username and local computer hostname in the format user@host).
ssh-rsa AAAAB3NzaC1yc2EAAAADAQABAAABgQDf+TtsB3OSpXL318fmcT7NVc33R9dhjyuiW/9dMTkMFfFbEb1y+nHJTZeMr8iw4DKR9wj6DIZ0/XEXU7fzQCWXlQkUUSb9tzGI5dwf73jGYBpYB+kI5b5MczPVGflMPg1j1LtrFgGkMvO3rknUj03rYSvLeNqbjT91+XotgvRu68lDOWXMpvTkQ8EaPa7ZhH/sZhqkgnjtHRDlilisOk0M93/cZAPe+RoFvyAyNCVbB42hxRalyuaIp0i4IZtNdGH0JZ/eUGMijGGkTe0452yefpEWxQF26UQukmLp7tgCUkdfiR7p9i4qEnbIyH57p4tU+W3RVEPqcHF3ic2lSkedaTew2u1cadhyOxKM/44ma3G/bOhg1tZhu04SCFi5y+6qzSHmXEOlkireGQgKdgmiJCQi3GPqGkNKuuH6Rig7vTvxoJ0iF9/nt17TItAH63KcwIgLVcPXGJOKBES/i5xB6VFv1zCUB90DyNlbW/kFslaKjXVWzZqNFaosQkxjRNk= user@FET-CND1221PKJ
Private key
Your private key should look similar to the output below - a block of characters with a OPENSSH PRIVATE KEY header and footer - your actual output will be longer than this.
-----BEGIN OPENSSH PRIVATE KEY-----
b3BlbnNzaC1rZXktdjEAAAAABG5vbmUAAAAEbm9uZQAAAAAAAAABAAABlwAAAAdzc2gtcn
NhAAAAAwEAAQAAAYEA3/k7bAdzkqVy99fH5nE+zVXN90fXYY8rolv/XTE5DBXxWxG9cvpx
m25BSiBmDEaKvS4SOwq0Hbc01LWfZBNDOgXoYy4gxbAchxWFnN2aA8Pi0jZGfaGbVdkNMW
lBXjY33qcTqXUAAAATb3dlbkBGRVQtQ05EMTIyMVBLSg==
-----END OPENSSH PRIVATE KEY-----
If both of these look correct we need to check the public key has been properly copied onto the server.
Check you have copied your public key correctly to the server
The next step is to connect to the server using the Azure CLI, so we can check if your public key has been properly added.
Connect to the server using Azure CLI
In a terminal window, login to Azure CLI with your UWE account:
Connect to CSCT Cloud using the CLI:
You should now be in a terminal session on the server:
Welcome to UWE CSCT Cloud

By logging onto this computer, you acknowledge your obligation to
familiarise yourself with and abide by the University’s Acceptable
Use Policy. This Policy sets out the responsibilities and required
behaviours for anyone who makes use of the IT facilities provided
by UWE Bristol and is available from: http://go.uwe.ac.uk/aup

Last login: Wed Nov  5 14:00:46 2025 from 127.0.0.1
user@uwe.ac.uk@csctcloud:~$
Info
You can always check you're using a terminal window on the server by looking at the prompt (the start of the input line) - when working on CSCT Cloud it will include the hostname csctcloud, like this:
If Azure CLI is unavailable you need to follow the steps to Install Azure CLI. If you cannot login in using the CLI you need to go back to the Copying keys to the server instructions and start from there.
Check you have a .ssh directory
This is where files related to SSH connections are stored, use the command below to check:
If this doesn't output True, go back to the Copying keys to the server instructions and carry on from Save your key on the server.
Check you have an authorized_keys file
This is the file we use to store public keys which are authorised to be used to connect to the server with, check this file exists using this command:
If this doesn't output True, go back to the Copying keys to the server instructions and carry on from Save your key on the server.
Check file permissions
The permissions on the .ssh directory and authorized_keys file need to be correctly set to prevent other users on the server from being able to modify them (which could allow them to login as you) - OpenSSH will refuse to allow you to login using public key authentication if the permissions are wrong.
Run the following two commands to set the proper file permissions on these paths:
Check your public key is present
Finally, we need to take a look at your authorized_keys file to check your public key has been properly copied to it.
Run the following command:
This should output your public key, which should be the same as when you checked you had a valid public key earlier on this page:
user@uwe.ac.uk@csctcloud:~$ cat ~/.ssh/authorized_keys
ssh-rsa AAAAB3NzaC1yc2EAAAADAQABAAABgQDf+TtsB3OSpXL318fmcT7NVc33R9dhjyuiW/9dMTkMFfFbEb1y+nHJTZeMr8iw4DKR9wj6DIZ0/XEXU7fzQCWXlQkUUSb9tzGI5dwf73jGYBpYB+kI5b5MczPVGflMPg1j1LtrFgGkMvO3rknUj03rYSvLeNqbjT91+XotgvRu68lDOWXMpvTkQ8EaPa7ZhH/sZhqkgnjtHRDlilisOk0M93/cZAPe+RoFvyAyNCVbB42hxRalyuaIp0i4IZtNdGH0JZ/eUGMijGGkTe0452yefpEWxQF26UQukmLp7tgCUkdfiR7p9i4qEnbIyH57p4tU+W3RVEPqcHF3ic2lSkedaTew2u1cadhyOxKM/44ma3G/bOhg1tZhu04SCFi5y+6qzSHmXEOlkireGQgKdgmiJCQi3GPqGkNKuuH6Rig7vTvxoJ0iF9/nt17TItAH63KcwIgLVcPXGJOKBES/i5xB6VFv1zCUB90DyNlbW/kFslaKjXVWzZqNFaosQkxjRNk= user@FET-CND1221PKJ
If you have added multiple public keys to your file, these should appear one after the other.
If your key is missing from this file, or the file is empty, go back to Copying keys to the server and try again.
Check your SSH configuration file
Your SSH configuration file contains information SSH uses to connect to the server (like your username and which key file to use) - this will have been created automatically when you used Visual Studio Code to setup a connection to the server.
Warning
If you haven't completed the steps to connect to the server using Visual Studio Code it's possible you won't have an SSH configuration file yet.
Check if you can successfully connect to the server using a terminal then go and complete the setup steps for Visual Studio Code.
Open your configuration file
Your SSH configuration file lives under your home directory/user profile directory.
Check your file
Open this file in text editor (e.g. Visual Studio Code) and check it against the example below:
Some things to check for:
- Hostname is
csctcloud.uwe.ac.uk, spelt correctly - User is your full UWE email address, all in lowercase and including the host portion, for example:
a.student@live.uwe.ac.uk - If specified, IdentifyFile points to a private SSH key file which definitely exists
Check Visual Studio Code is using the correct SSH configuration
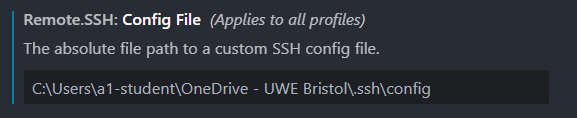
For UWE lab computers only - check that Visual Studio Code is using the version of your SSH configuration file available on OneDrive.
Open up the Settings page with Ctrl+, (or Cmd+, on a mac), or by navigating from the file menu (File > Preferences > Settings). In the Search Settings box search for Remote.SSH: Config File.
Check the value here is the absolute path (full path, starting from C:\) to the config file in your OneDrive directory: